
WordPress is one of the most popular blogging platforms on the Internet. One of the first things I do when I setup a new WordPress installation is harden it. You can read about a number of my suggestions in the article Secure Your WordPress Installation. However, one of the more complex activities I undertake is securing the upgrade facility so that it uses SSH for handling all of my site’s updates.
This is for Ubuntu 10.04 LTS:
Create a “wordpress” user that will be used to manage your site.
% sudo adduser wordpress
Add the following lines to your wp-config.php, I usually put mine right after the Language definition:
 /**
 * Define Upgrade FTP Usernames and Passwords
 */
 define(‘FTP_BASE’, ‘/usr/local/sites/mysite/wordpress/’);
 define(‘FTP_CONTENT_DIR’, ‘/usr/local/sites/mysite/wordpress/wp-content/’)
 ;
 define(‘FTP_PLUGIN_DIR ‘, ‘/usr/local/sites/mysite/wordpress/wp-content/plugins/’);
 define(‘FTP_PUBKEY’, ‘/home/wordpress/.ssh/id_rsa.pub’);
 define(‘FTP_PRIKEY’, ‘/home/wordpress/.ssh/id_rsa’);
 define(‘FTP_USER’, ‘wordpress’);
 define(‘FTP_PASS’, ”);
 define(‘FTP_HOST’, ‘localhost’);
Edit each of the variables for your installation.
Create an SSH public/private key pair for your wordpress user:
 % sudo su – wordpress
 % ssh-keygen
When prompted to enter a password, just hit return to create the private key without a password.
Add the public key to wordpress’ authorized_keys file:
 % cp .ssh/id_rsa.pub .ssh/authorized_keys
 % exit
Set permissions on the private key so Apache/WordPress can access it:
 % sudo chgrp www-data /home/wordpress/.ssh
 % sudo chmod 750 /home/wordpress/.ssh
 % sudo chown www-data /home/wordpress/.ssh/id_rsa
Install php SSH2 libraries:
 sudo apt-get install php5-dev
 sudo apt-get install libssh2-1-dev
 sudo apt-get install libssh2-php
Test to ensure PHP sees the new SSH2 library:
% php -m | grep ssh2
It should output “ssh2”
Restart Apache so it pulls in the new PHP libraries:
| 1 | % sudo service apache2 restart |
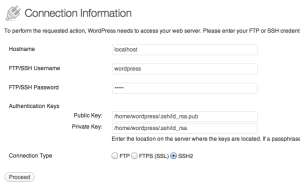
You should only see this screen the first time you use this configuration. Select “SSH2” from the Radio Buttons and “Proceed”.
You will now be using SSH access to/from your server to handle all updates.
Related: Secure your WordPress installation