I run an Astaro Security Gateway (ASG) from Sophos (now called Sophos Unified Threat Management (UTM)) for the bulk of my firewall needs at home. Sophos (and Astaro before them) did a nice thing in allowing Home Users to run the product for up to 50 internal IP addresses for free. You can download the home version of the product here, including a VMware Appliance, which is what I use.
This is not your run-of-the-mill firewall and as such the configuration for various options can be quite tricky. I recently wanted to expose an internal server’s web server on a public URL so I could access it when I’m not at home. There are two ways of accomplishing this goal:
- Configure a Destination NAT (DNAT) to map a public IP address and port to your internal server IP address and port.
- Use the Astaro Web Application Firewall to provide a public web server, along with all of the protection Sophos can provide.
Number 2 appears to be the better option, so here is how to get a Web Application Firewall for your internal web server up and running.
Configuration
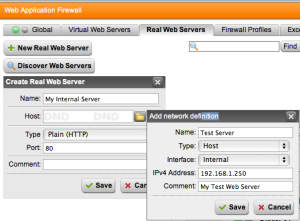
 The first step is to establish your internal web server as a known Real Web Server. Head over to the Web Application Security section and select Web Application Firewall. At the top of the Web Application Firewall section you’ll see a series of tabs for the various configuration elements. Select Real Web Servers. On this tab you’ll probably find a list of internal web servers that the Astaro has scanned and pre-identified for you. If the web server you wish to expose to the Internet is listed, you can use that entry. For the purposes of this exercise, I’m going to build a new Real Web Server.
Click the New Real Web Server button and define your internal server. You will also have to create a Network Definition entry to represent the Internal host you’re configuring. Save the Network Definition and then save your Real Web Server definition. The definition we’re creating is only for Port 80 (standard web traffic) though you can also create one for Port 443 (encrypted web traffic (SSL/TLS). If you want both, you’ll have to create two Real Web Server definitions. Once completed, enable your Real Web Server by clicking the green bubble and enabling it. You now have a working Real Web Server on your network.
The second step is to define the public IP address we will be using to host our new web server. If you are going to host the server on the same IP address as your Astaro Security Gateway, you can skip to the next step. Since your ASG is probably already at a public IP address, you’ll want to create an Additional Address on which to host the server. Click Interfaces & Routing then select Interfaces. Once in the Interfaces area select the Additional Addresses tab to create your new address. Click the New additional address… button and create a new Public IP address for your web server.
 The third step is to create a new Virtual Web Server. The concept is that you are creating essentially a web proxy to be hit by the outside visitors. Once the Astaro inspects the traffic and determines that it is harmless, it will then allow that traffic to the inside web server and back again.
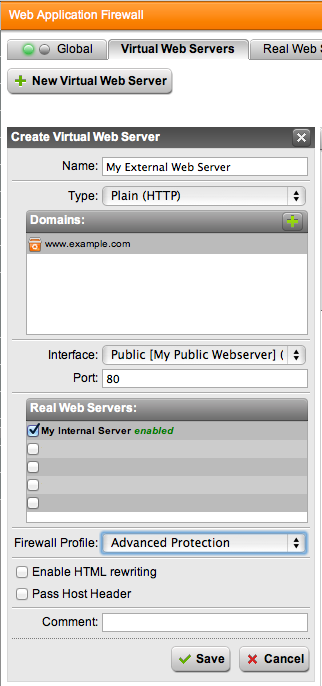
To create a Virtual Web Server click the Virtual Web Servers tab under Web Application Security and Web Application Firewall. Click the New Virtual Web Server button and give your server a recognizable Name. Leave Type as Plain (HTTP) unless you created and/or need a HTTPS server.
Under Domains add one for each of the URLs to which your public web server should respond. If a Fully Qualified Domain Name (FQDN) is not listed here, then the public web server will not respond to the request.
Select the public address you created above for the Interface, you should be able to leave Port set to the default of 80.
In the Real Web Servers section, check the box next to the internal server you created in the first step. It should show up here with the name you assigned and should be listed as enabled.
The Firewall Profile you select will determine the level of protection the Astaro is providing to your internal web site. These are all defined in the Firewall Profiles tab, where you can also define custom Firewall Profiles to provide specific protections to your site. The Advanced Protection Firewall Profile provides protection against Cross Site Scripting, SQL Injection, Cookie signing, Form Hardening, and AntiVirus scanning for uploads to your site. If you need more or less protection customize your profile.
Click the Save button and you will now have a new Virtual Web Server that represents, and is tied, to your Real Web Server.
The last step is to enable Web Application Firewall under the Global tab.
Test your public web server and ensure that it is working properly. You can use the Live Log under the Global tab to see traffic as it is coming into your server and determine if there are any errors. Make sure you are using one of the FQDNs you defined under Domains when accessing your site, otherwise the server will not return a proper response.
You now have an Internal web server protected by the Astaro Web Application Firewall. You can find additional documentation on this Astaro feature on their website.
