Internet of Things (IoT)
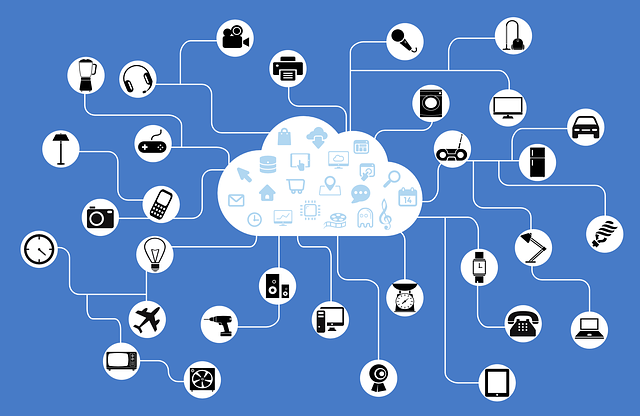
The Internet of Things is a label that the computer industry, the media, and manufacturers have created to describe small devices that live on a network and provide a specific feature.
The Internet of things (stylised Internet of Things or IoT) is the internetworking of physical devices, vehicles (also referred to as "connected devices" and "smart devices"), buildings and other items—embedded with electronics, software, sensors, actuators, and network connectivity that enable these objects to collect and exchange data. [...] The IoT allows objects to be sensed and/or controlled remotely across existing network infrastructure, creating opportunities for more direct integration of the physical world into computer-based systems, and resulting in improved efficiency, accuracy and economic benefit. -- Wikipedia
In my household I've defined IoT to encompass the following types of devices:
- Any device with an IP address, not running a macOS, iOS, Android, Windows, or Linux operating system, that
- Does not require direct access to internal storage devices, and
- Does not store personal data
Examples of IoT devices in my home include:
- Philips Hue Lightbulbs and associated Bridge
- SmartThings Bridge
- Netgear Arlo Bridge
- Sonos Speakers
- Harmony Remote Hub
- Kindles
- Amazon Echos
- Ring Doorbells and Chimes
- Chromecast (mine doesn't access any internal resources)
- IP Video Cameras
- Any other types of WiFi connected sensors (Smoke detectors, Temperature, Humidity, etc.)
- Anything related to a Smart Home (lights, light switches, power, etc.)
Micro-Segmentation
What is micro-segmentation? This is a relatively new concept in security and is what I believe will be required in order to combat the threats we now face on the Internet and in our Enterprises.
Traditionally, if you were in Enterprise IT Security, you built a perimeter. The most common component of that perimeter was a Firewall. Things outside of the firewall were "bad", things inside the firewall were "good". The firewall protected us from the bad things by blocking them from coming into our network. You placed a firewall on your inbound Internet connection to keep yourself secure from everything running "out there". Next, you had to connect to a vendor, partner, or customer, so you extended your firewall to protect yourself from them as well. As your bandwidth to the Internet continued to increase, you eventually diversified and brought a connection into another site, which necessitated having another firewall, and a perimeter was born. It looks something like this:
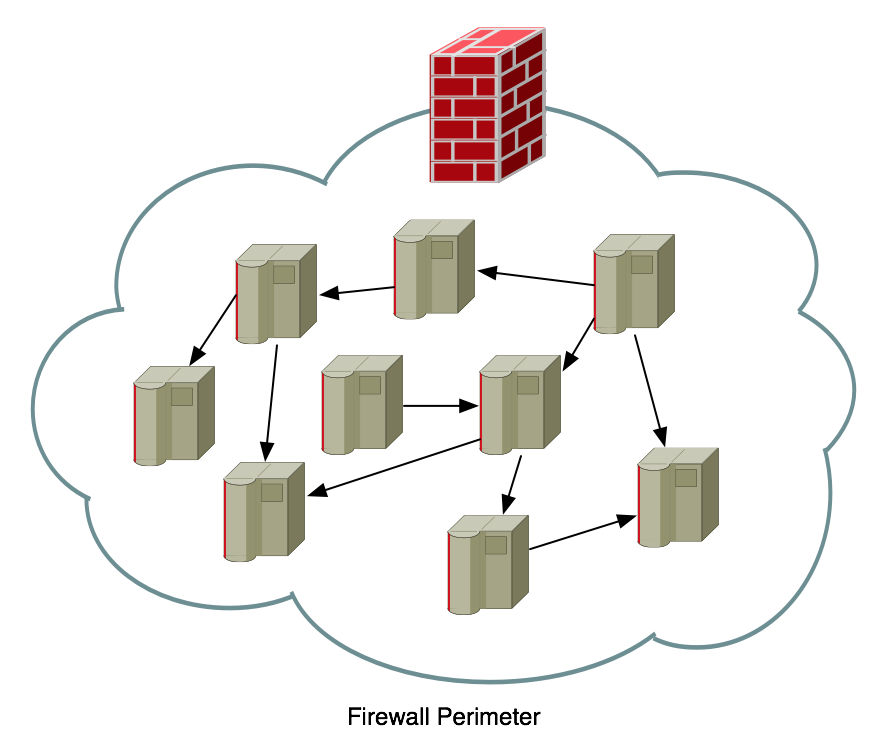
The problem with Perimeter-style security is that you've made a fundamental assumption that things on the inside are "good" and things on the outside are "bad". This means that if something does get through the perimeter that all of a sudden it will be trusted to move around the inside network. That's a really bad assumption.
The perimeter defense also has another major flaw, you have to open it, a lot. Every time there is a service that needs to flow into or out of your network, you have to add firewall rules to allow it, this is also known as "opening ports". Since the firewall is your primary perimeter defense, that means you're "poking holes" in that defense (we actually use that phrase in IT, "poke a hole in the firewall"). Pretty soon your nice perimeter defense looks like this:

The more you poke holes in the firewall, the worse the perimeter defense looks. Every green arrow is an allowed connection into a network host, but then that host can connect to everything else inside.
Micro-segementation is an architecture that distributes the "perimeter" to only encapsulate, and protect, specific items (applications, services, servers, departments, etc.). Building this type of architecture will allow you to better protect each individual asset because you're only going to "poke holes" for the specific services required to run that asset.
I saw a great presentation on this from Edward Amoroso (@hashtag_cyber), which you can also read in this article: Remove the balloon from the dartboard.
I believe that the larger threat globally is that our personal networks are not being adequately protected and yet they are growing at a much faster pace than Enterprise networks, with far less ability to secure them. We are all buying "Smart Things" at Home Depot and Lowe's and then bringing them home and plugging them into our personal networks. The same networks into which we plug our work laptops. For not a lot more money than a traditional, high-end, wireless network, you can instead build an architecture that protects yourself, but more importantly the World, from your Internet of Things.
Desired Architecture
To be honest, we aren't really going to be performing micro-segmentation. If we were going to do that, we'd have to take each of our IoT "hubs" (SmartThings, Philips Hue, Sonos, etc.) and segment each off to its own subnet (own network) with its own firewall rules. Micro-segmentation would be a great idea and would enhance the security of your network, but there are limitations to most prosumer (we're talking a level above standard consumer networks you buy at Best Buy or Staples, but a notch lower than most Enterprises) networking equipment that doesn't make it practical. Instead, we're going to segment our IoT devices into their own subnet, and SSID, to keep them segregated from our internal network.
The network equipment I decided to use was Ubiquiti Wireless. I was first introduced to this equipment through a Security Researcher named Troy Hunt in his blog article titled Ubiquiti all the Things. I purchased a similar set of equipment, but fewer Access Points (APs) as I had a smaller home to cover. My equipment list was the following:
- Ubiquiti USG UniFi Security Gateway (not the Pro Model)
- Ubiquiti UC-CK Unifi Controller Cloud Key (optional)
- 2 x Ubiquiti Unifi US-16-150W PoE Network Switch
- 1 x Ubiquiti Unifi UAP-AC-PRO-US 802.11ac Dual-Radio PRO Access Point
The total cost for all of this equipment was $1,041.28 US. That's a lot of money for a network, but you could skip the Cloud Key (more later) and you probably won't need two switches (I did). I replaced the following equipment:
- Cisco SG 300-28 (28-port Switch) - $492.89
- Cisco SG 300-10 (10-port Switch) - $207.98
- Asus RT-AC3200 Tri-Band Wireless Gigabit Router - $187.88
- Custom-built pfSense Firewall - $374.99
So, at $1,263.74 for my previous setup, this is actually cheaper and I'll be selling all of the old components, other than the pfSense firewall, so I'll make quite a bit back.
Once everything was connected, the physical topology looked like this:
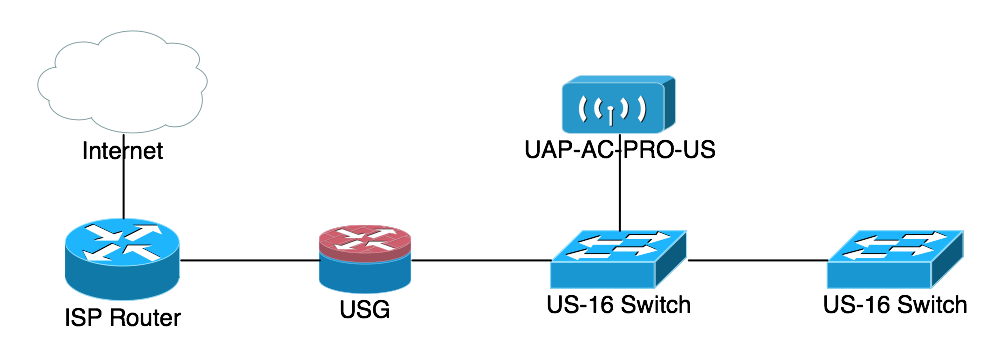
We'll be doing the segmentation with a combination of different SSIDs mapped to different VLANs being routed on different Subnets. The beautiful thing about the Ubiquiti equipment is that the Ubiquiti Access Point (UAP) supports up to 4 different SSIDs, the switching equipment supports multiple VLANS, and the USG can route multiple IP subnets and provide DHCP service to each of them.
Initial Configuration
First, let me address the use of the Cloud Key. All of the equipment I'm discussing here is in Ubiquiti's UniFi line of networking equipment. All of these components are meant to be configured from a central management interface. You can still configure the equipment via console cables, or by SSHing into the system and using the Command Line Interface (CLI), but that's not the intent. The Cloud Key is an all-in-one device that provides the management interface for all of your Ubiquiti UniFi equipment. It is powered via Power-over-Ethernet (PoE) from the US-16 switch and makes the entire system turn-key. However, you can also run the Ubiquiti UniFi Controller for Macintosh, Windows, or Linux (you can even run it in The Cloud). This is a free download from Ubiquiti, but also means that you need to be able to have it running somewhere whenever you want to make configuration changes. I opted to have a dedicated piece of hardware handling these functions as part of the overall configuration.
The initial setup of the Ubiquiti equipment was straightforward, with the exception of the USG. The two US-16s were drop-in replacements for the Cisco switches and didn't require any initial configuration to start working. I then plugged the Cloud Key and the UAP into the first US-16 switch and they too just powered up via PoE from the switch.
When the Cloud Key came online, I connected to it at https://unifi.ubnt.com/ which takes you to your Ubiquiti account and has a scanner that finds the Cloud Key on your local LAN. Once connected to your Cloud Key you set up an Administrator username and password and then "Adopt" each of your network components to be configured using the Cloud Key. This is where I ran into issues with the USG...
My internal network runs on an RFC-1918 subnet that is NOT 192.168.1.0/24. The DHCP service is being provided by my pfSense firewall and for the purposes of this upgrade I wanted to keep the pfSense firewall online during the migration, to minimize downtime. Unfortunately, the USG comes pre-configured to hand out 192.168.1.0/24 on the inside interface. In order to "Adopt" the USG into the Cloud Key, the Cloud Key must be able to talk to it on the same subnet. That means the Cloud Key must be on the 192.168.1.0/24 network, which was a real hassle in my configuration. I eventually had to bite the bullet and take the pfSense firewall offline, put the USG in, let everything pull 192.168.1.0/24 addresses, and then "Adopt" the USG into the configuration, before I could re-configure the USG to hand out the internal network I wanted to use...it burned several hours of my time, so hopefully you'll learn from reading this that you must put the USG into the network and just let it be the DHCP server and hand out the network it was configured to use, it'll add some time, but fighting it makes it worse.
Micro-segmentation Configuration
The first step is to set up the VLANs you're going to be using for the various networks within your LAN. This is done through the UniFi Controller (Cloud Key) interface, found here:
For the purposes of this discussion you should only need to create one additional network (for your IoT devices).
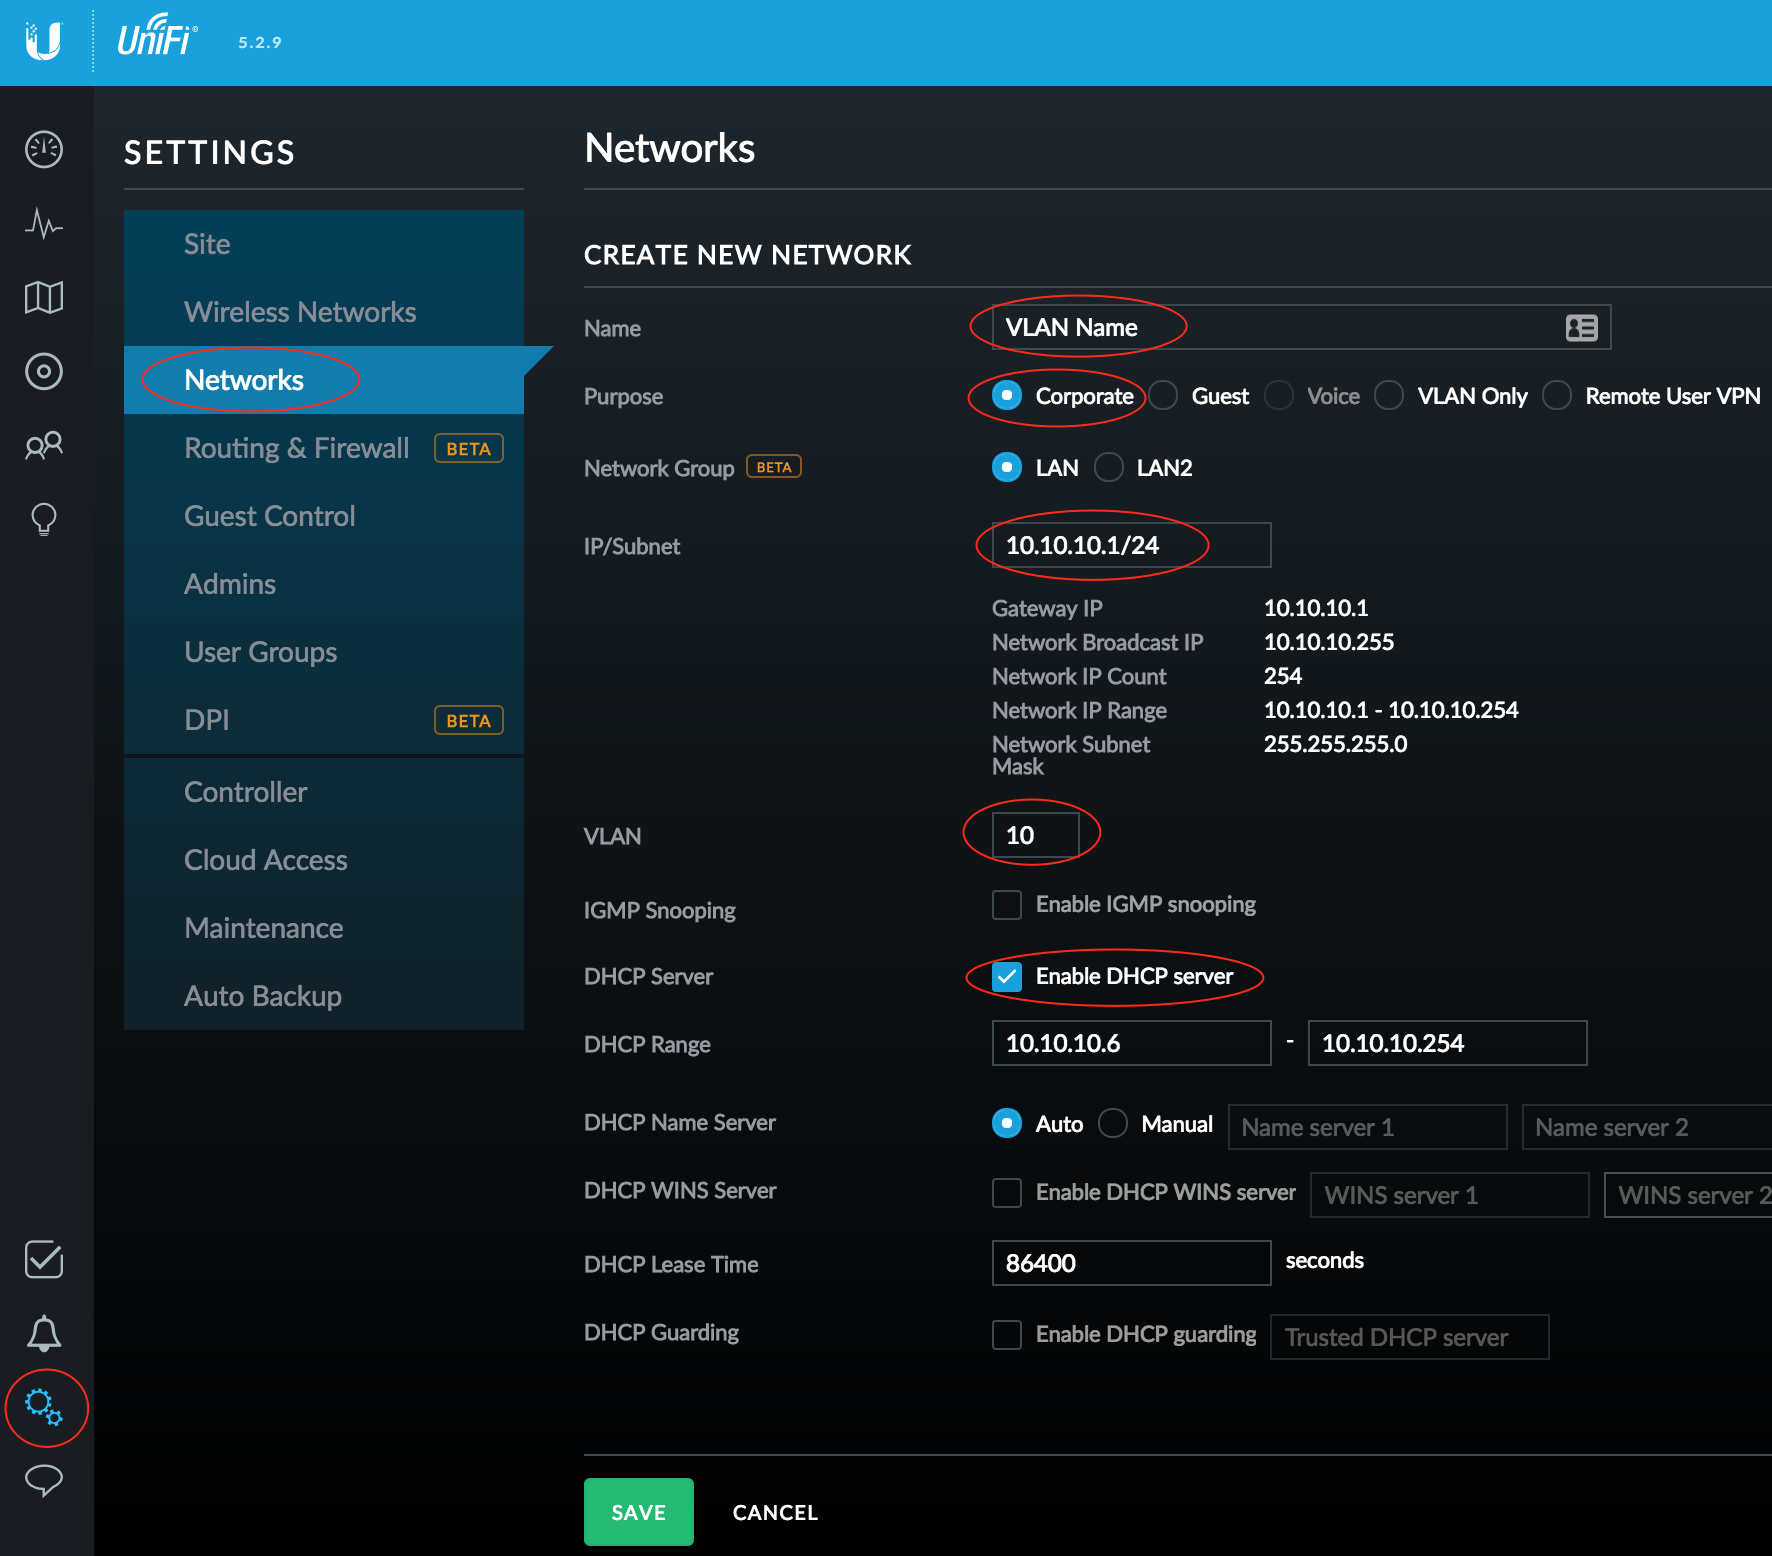
- Go to Settings > Networks and click Create New Network
- Configure a VLAN Name, set it as a Corporate network (this means it will have a separate subnet)
- Input the IP/Subnet with the gateway address you wish the USG to use for itself (this will be the default router for your clients)
- After entering the CIDR (the /24) at the end of the gateway address, an Update DHCP Range button will show up, click this to automatically enable the DHCP Server and configure a DHCP range (adjust to suit)
- Enter a VLAN number (between 2-4095) for the IoT network
- Click Save when you're done with the configuration. You now have a VLAN in which your IoT devices can live.

Next we need to create a new SSID and assign it to our new VLAN:
- Under Settings > Wireless Networks, click Create New Wireless Network
- Configure a SSID network name, WPA Personal security, and a Security Key
- Under Advanced Options, check Use VLAN and enter your VLAN number
- You will now have an end-to-end solution for your IoT devices. Connect them to your new SSID, where they'll be mapped to your new VLAN, and routed directly to your USG and passed to the Internet
You now have your IoT devices on a separate network from your default LAN (which was the original network that the USG built for you, and to which you probably configured your initial SSID). Now when you add an IoT device to your network, configure it with your IoT SSID to provide segmentation. Additionally, you should also take any physically wired devices (SmartThings Hub, Hue Bridge, Sonos Bridge) and configure the ports in the switch to only speak on your IoT VLAN.
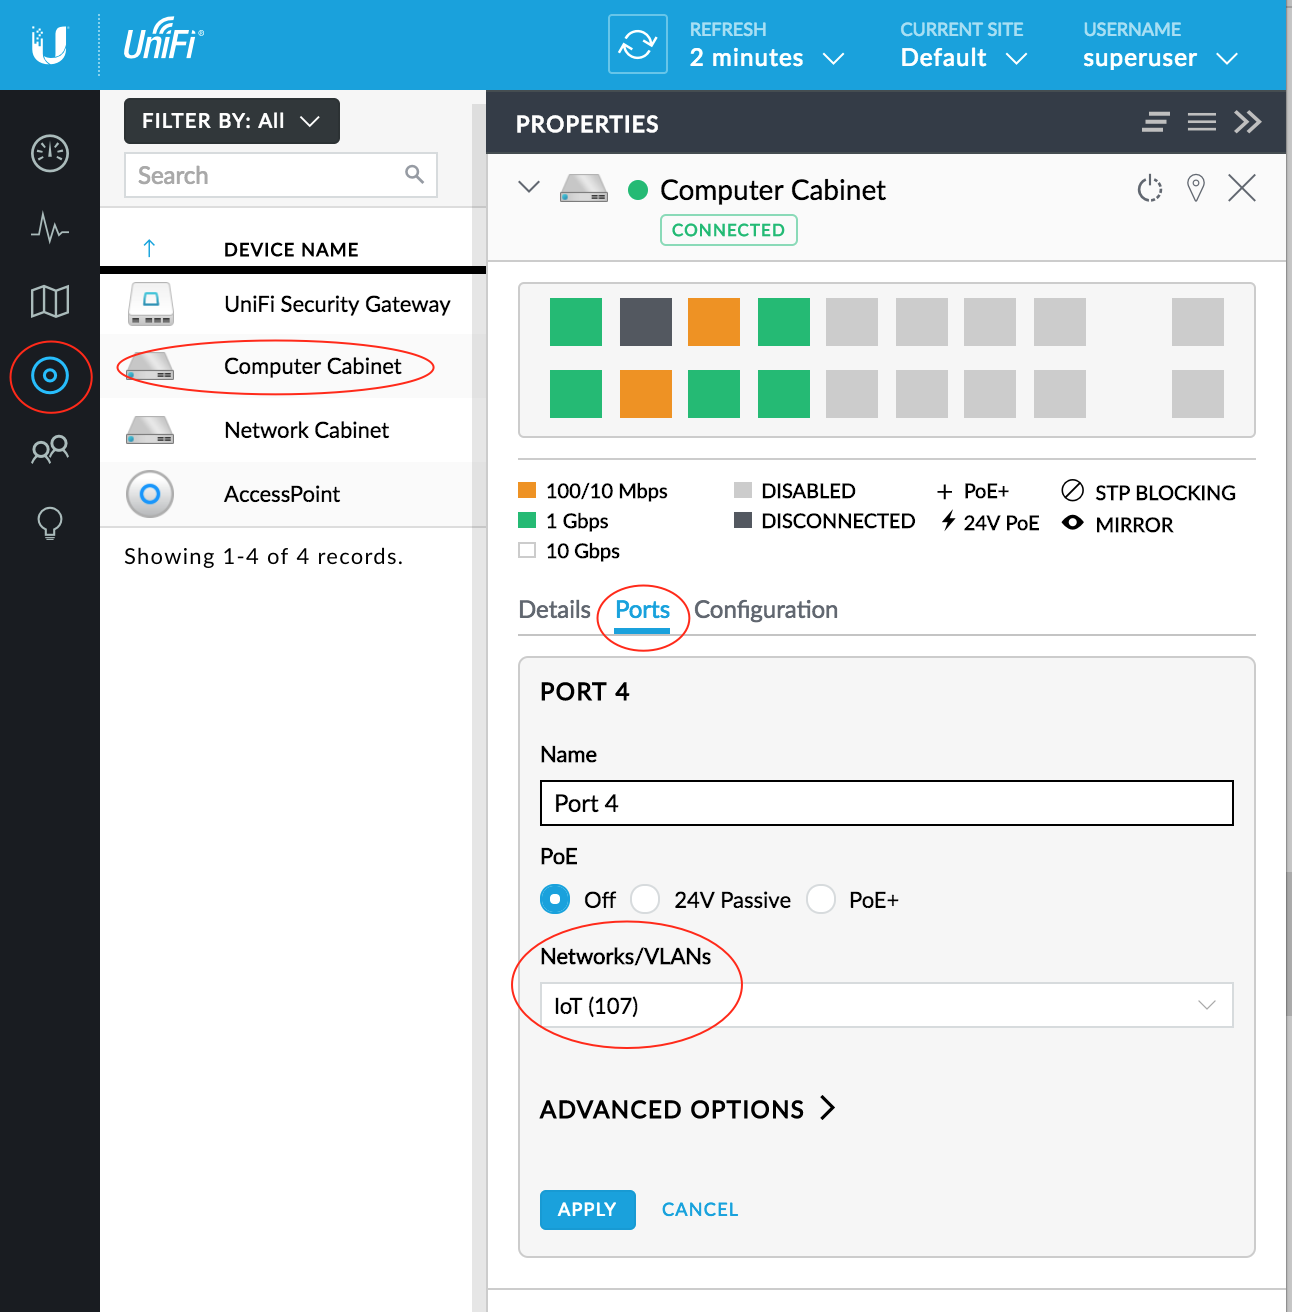
Perform the configuration for the Switch Port:
- Under Settings > Clients, select the appropriate switch
- Under the switch configuration, click Ports, then click the little Pencil Icon next to the port you wish to configure
- Change the VLAN assignment under Networks/VLANs to be the appropriate VLAN for your IoT devices
- Don't forget to Apply the changes, which will then provision those changes from your UniFi Controller to your switch
The network configuration is now complete. You should be able to have both wired and wireless clients join the IoT network and they should work normally. However, there is an additional security step you should take to complete the micro-segmentation of the IoT network.
Firewall the Things
The USG will automatically route all networks of type Corporate between each other (in fact, it creates uneditable/undeletable firewall rules to enable this behavior). You could have made your IoT network of type Guest which would allow you to automatically restrict its access to your Corporate networks, but in my case I set up my Guest network to have a Captive Portal. On the USG, all Guest networks have to be treated the same, so if one has a Captive Portal they all will and my IoT devices cannot authenticate via the web page, so they would be denied access. If, like me, you want to have a real Guest network, then you're going to have to firewall the IoT network from your Private network.
To make long-term management of your Firewall easier, we're first going to define groups for the following subnets on your network:
- Private (the primary, internal network for your computers)
- Public (the network that exists outside of your firewall, between you and your ISP, though you may not have one)
- IoT (the network you built for your IoT devices)
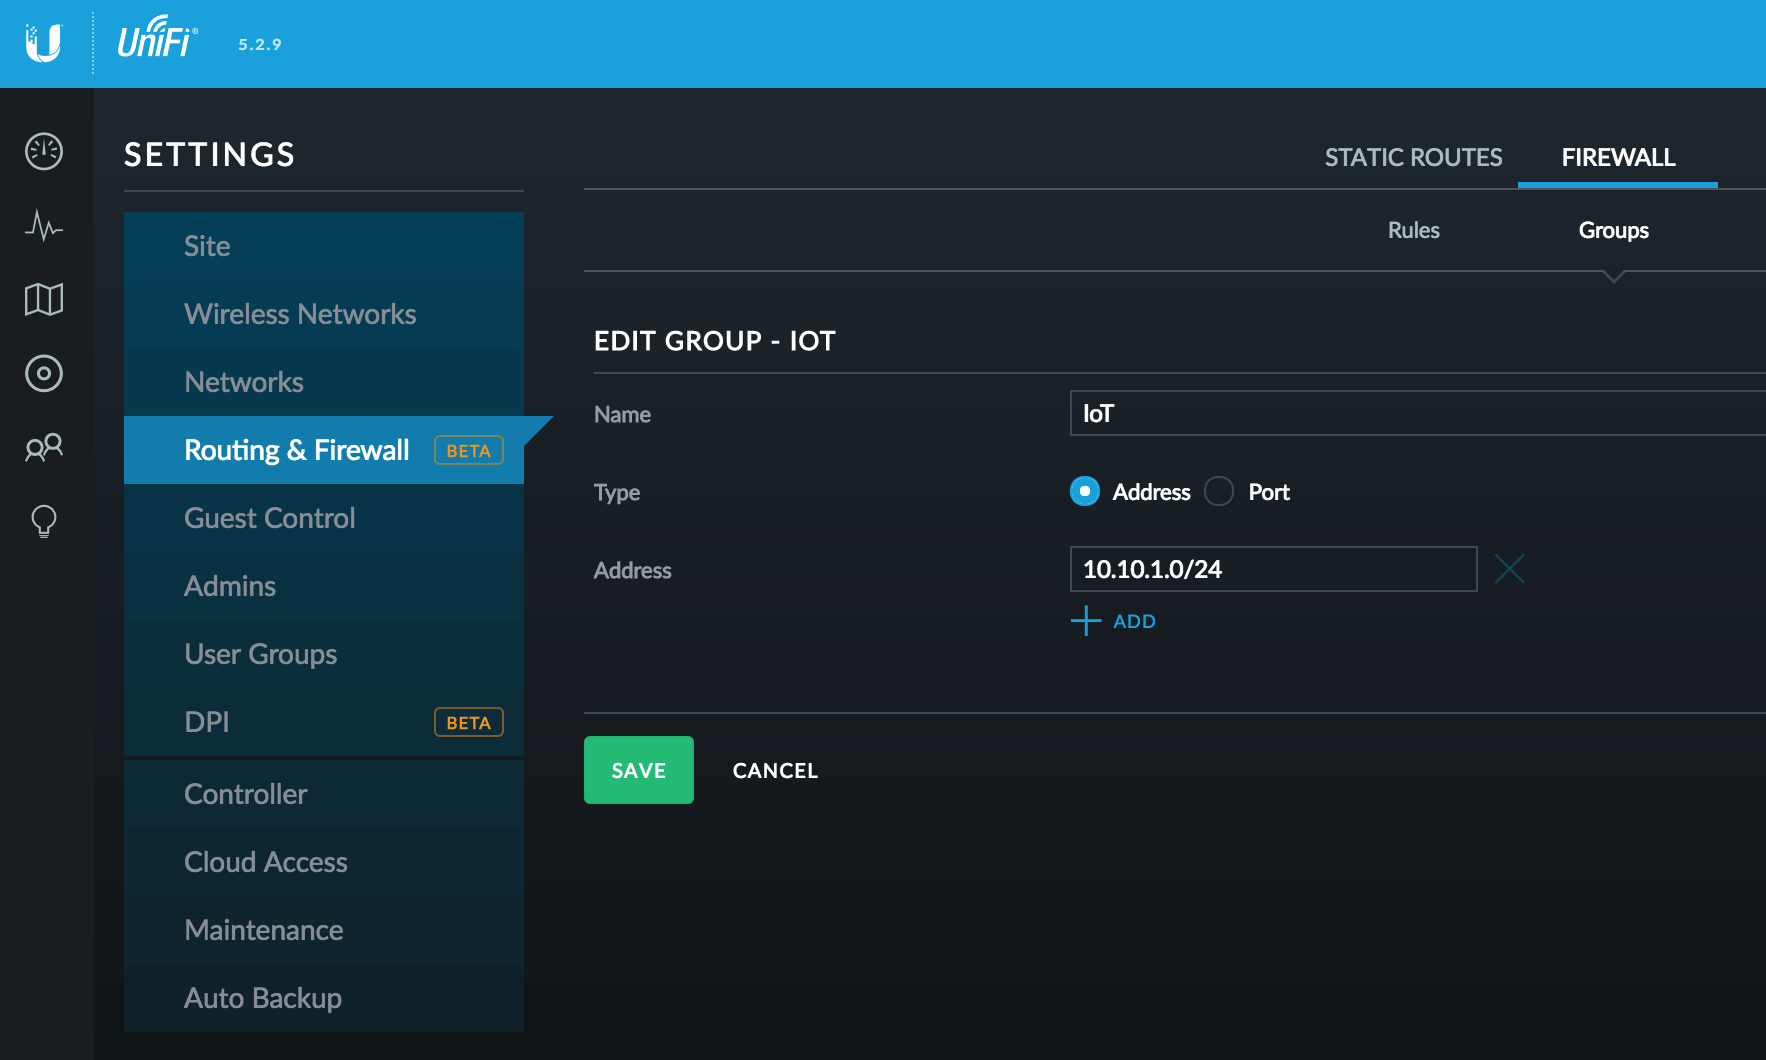
Groups are configured at your UniFi Controller:
- Access Settings > Routing & Firewall > Firewall tab
- Select the Groups tab
- Click Create Group
- Give the Group a Name, set Type to Address, and define the Address as the Subnet for that network
Once you have created at least two groups, Private and IoT, you can configure a Firewall rule to secure them from each other.
Firewall States
Before I jump into the configuration it will be important to understand something about firewall connection states.
The two most common states you encounter when working with firewall rules are:
- New - A brand new connection being opened to/from a remote site
- Established - An existing connection that has already been allowed through the firewall and subsequent traffic on that same connection is being allowed
Firewall Rule Configuration
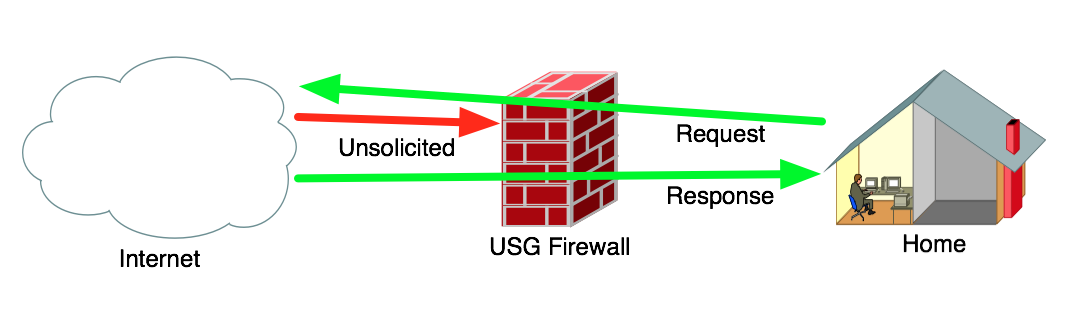
At the Firewall we want to deny traffic from the Internet that is attempting to make a new connection into our network (Unsolicited), but we want to allow traffic from the Internet that is in Response to a connection that was Requested from inside the network (Established). You want to block bad guys from coming in, but you also want to see the web page from Amazon that you asked your web browser to open up when you typed in https://www.amazon.com/.
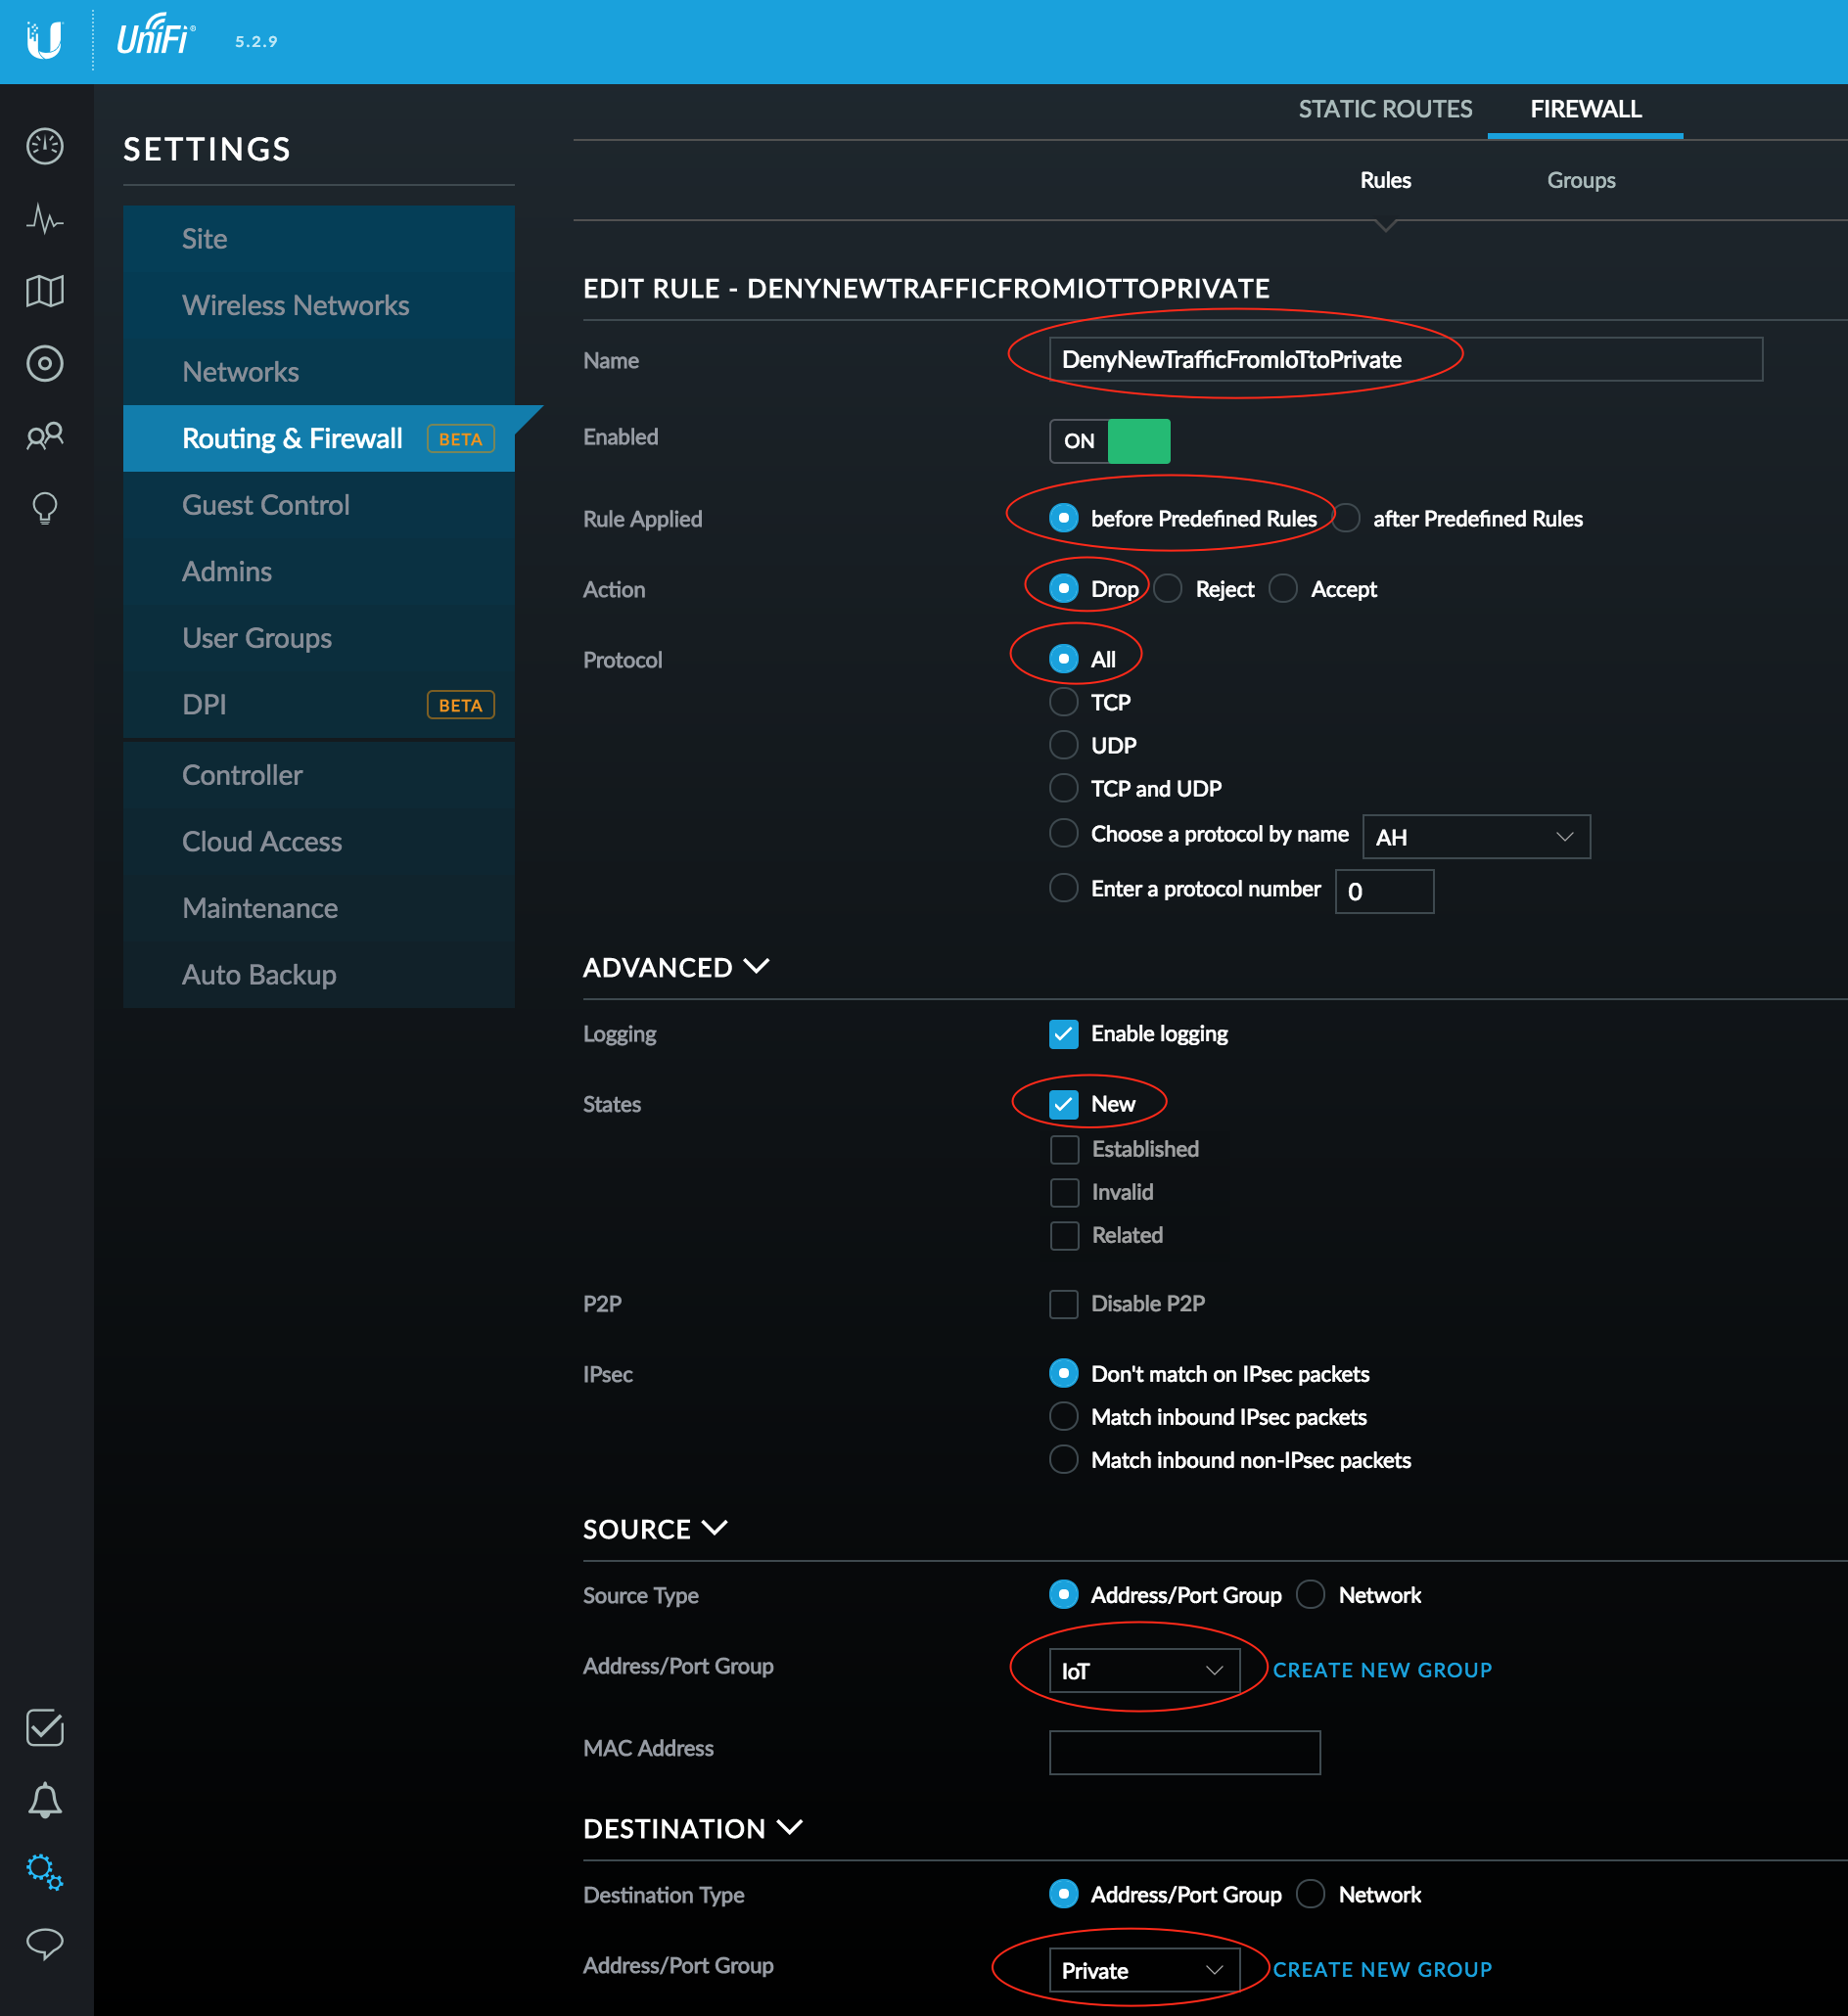
To block New connections coming from your IoT network into your Private network, configure a Firewall rule:
- Access Settings > Routing & Firewall > Firewall tab
- Select the Rules tab
- Click Create New Rule
- Enter a Name for the rule (e.g. DenyNewTrafficFromIoTtoPrivate)
- Select before Predefined Rules (or else it won't work)
- Select Drop as the Action (this is a Deny rule)
- Select All for the Protocol (all traffic will be denied)
- Enable logging if you wish
- Check New for the States of the connections you will block
- Select Address/Port Group for both the Source Type and Destination Type
- Select your IoT group for the Address/Port Group under Source
- Select your Private group for the Address/Port Group under Destination
Once you click Save it will take approximately 60 seconds for the rule to be applied in your Firewall. If you only selected New under States then you should be able to still reach things in the IoT network from your Private network (e.g. ping them), but the reverse will not be true.
You can test your connectivity by placing an iPad or iPhone on the IoT network, then from the iOS device ping something on the Private network, it should be blocked, but when you ping the iOS device itself from the Private network, you should get a response.
If you desire complete segregation of the two networks, edit your Firewall Rule and check the other three states (Established, Invalid, Related) and save it. You will no longer be able to access systems across internal networks in either direction.
When testing you will ALWAYS be able to ping the default gateway (USG), even from the wrong network, since it is using sub-interfaces and you're really just pinging the same interface, so be sure to test actual hosts inside your various networks.
You now have a MUCH more secure network than when you started and you've successfully segmented your IoT devices from the rest of your network.