I'm a big fan of the Ubiquiti UniFi networking gear, I wrote about how I was able to use their gear to provide micro-segmentation of my IoT devices from the rest of my network. However, one area that Ubiquiti really falls down on is internal DNS resolution of DHCP hosts. This is a problem they've had with their UniFi Security Gateway (USG) for quite some time, as documented here.
Basically, however your device identifies itself to the DHCP server on the USG is how it will be inserted into DNS. If there's a space, then there's a space (and resolution will fail). There is no where to configure a default domain name (search domain) and if you use a Fully Qualified Domain Name (FQDN), resolution will fail. If you have to manually assign an IP address, it will not register in DHCP, so resolution will fail. Finally, even if you specify an alias via the USG configuration, that alias will be ignored in favor of the way the host identified itself to the DHCP server initially (no matter how broken, like having spaces), and resolution will fail.
I eventually gave up on Ubiquiti ever properly fixing this issue. I, and others, reported it in November, Ubiquiti claimed, multiple times, to be fixing it and never did. So, I've decided to configure my Synology NAS to perform forward and reverse DNS for my internal network. I have several servers on my network, so constantly accessing them by IP address is just too much of an inconvenience.
Initial Installation
There is pretty good documentation from Synology on configuring your NAS for DNS, but I ran into several issues for proper configuration, so I decided to write this post to document how I was successful.
First step is to install the DNS Server package from Synology by going to the Package Manager and then selecting the Utilities category. Once there, you should be able to find the DNS Server package and click Install.

Now that you have the DNS Server installed and running, it's time to configure it properly.
Configuration
Resolution
Configuring the DNS Server is performed by accessing the Main Menu and then running DNS Server.
Once in the DNS Server configuration select Resolution and perform the following configuration:
- Check Enable resolution services
- Check Enable forwarders
- Configure Forwarder 1 (e.g. OpenDNS or Google Server)
- Configure Forwarder 2 (e.g. OpenDNS or Google Server)
- Note: I used the two OpenDNS servers in the below picture
- Set Forward policy to Forward First - this will forward requests on to your Forwarders if they are not found in the local DNS Zones, and then if they fail, look up the query in the root zones. If instead you wish to fail the resolution after forwarding, use Don't query root servers
- Optional: Check Limit source IP service if you wish to limit the client to specific hosts or subnets that are allowed to use your DNS server (I limited mine to my inside subnet)

Master Forward Zone
Now that your DNS Server is up and running, it is time to configure a Master Zone for your internal network.
A Master Zone specifies that this server is authoritative for all of the Zone Records contained within it. A Secondary (Slave) Zone specifies that this server is authoritative, but is receiving the records from a remote server (the Master). A Forwarding Zone is one in which all queries are sent to a remote DNS server for resolution.
The Forward Zone is what translates the names you type (e.g. robpickering.com) into an Internet Protocol Address (IP Address) (e.g. 192.168.100.10).
To create your Master Forward Zone select the Zones option from the DNS Server application, then click the Create button and select Master zone. Configure the Zone as follows:
- Domain type: Forward Zone
- Domain name: [ whatever domain name you'd like ]
- Master DNS server: [ your public IP address ]*
- Serial format: [ I prefer Date ]
- Limit zone transfer: [Checked]
- Limit source IP service: [Optionally checked]

I personally check Limit zone transfer and then leave it blank, which is effectively preventing any Zone Transfers from your server (which is as it should be).
I also Limit source IP service, but for this one you'll have to go into the Source IP List and configure hosts or subnets that are allowed to query this zone. If you forget to do that and have this checked, your server will not respond.
Note: If you do not configure an IP address during this step, your zone will not load (see below for instructions on fixing it)
Clicking OK will save the zone. Now you can create some resource records!
Resource Records
Resource records provide the translation from a human-readable name to an IP address (and vice versa). To create a resource record in your Master Forward Zone:
- Select the Zone in which you want to create records, then click Edit and select Resource Record
- Click Create and then select the type of record to create (this will most likely be an A Type), the types are:
- A Type: An IPv4 forward lookup record (name -> IP)
- AAAA Type: An IPv6 forward lookup record
- CNAME Type: A canonical name (alias) (alias -> name)
- MX Type: Mail Exchange (domain -> mail server)
- NS Type: Name Server
- SPF Type: Sender Policy Framework, a way to define who is responsible (or allowed) to be sending email for your domain
- SRV Type: Service definition, specifies the server that is providing a given service
- TXT Type: Text description
- Enter the hostname in the Name field
- Enter the IP address in the IP address field
Zone not loading
When I first configured DNS on the Synology, I did not put an IP address in for Master DNS server, which will still create the Zone record, but it will fail to load properly. If this happens you'll have to manually create the NS record on the zone by doing the following:
- Edit your Zone file
- Create an NS Type record
- Leave the Name portion blank
- Set the Host/Domain to ns.[DOMAIN], where [DOMAIN] is your domain name for the zone (should match the domain portion in the Name area).
This should now allow the domain to load properly.
Master Reverse Zone
A Reverse Zone is what translates IP addresses back into the names. This type of zone is optional, but it provides the ability for hosts to get human-readable names for connections that are made to it (e.g. to provide FQDN (fully qualified domain names) in log files, like for connections to a web server)
To create your Master Reverse Zone select the Zones option from the DNS Server application, then click the Create button and select Master zone. Configure the Zone as follows:
- Domain type: Reverse Zone
- Domain name: Reverse IP Notation for your subnet*
- Serial format: [ I prefer Date ]
- Limit zone transfer: [Checked]
- Limit source IP service: [Optionally checked]
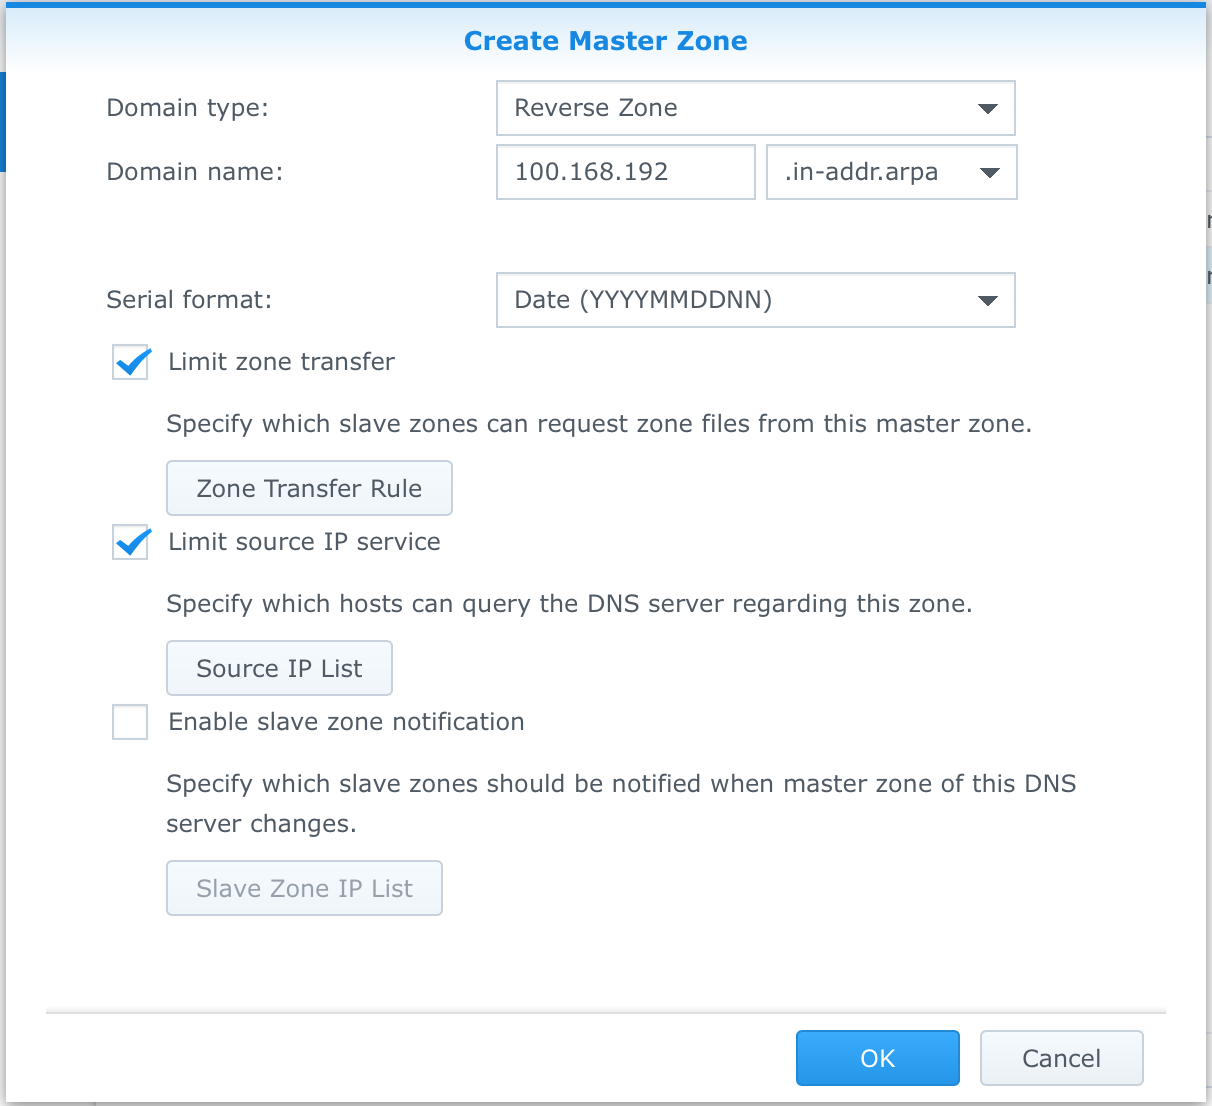
(*)Note: The Domain name for a Reverse Zone is actually the IP address subnet for which you want to provide records. In this example my internal network is 192.168.100.0/24, so my Reverse Zone is 100.168.192.in-addr.arpa. This is also for IPv4 subnets, if you wanted to provide Reverse lookups for an IPv6 subnet, you'd need to change the dropdown from .in-addr.arpa to .ip6.arpa.
Resource Records
Resource records for a Reverse Zone provide the translation from an IP address to a human-readable name. To create a resource record in your Master Reverse Zone:
- Select the Zone in which you want to create records, then click Edit and select Resource Record
- Click Create and then select the type of record to create (this will most likely be an PTR Type), the types are:
- PTR Type: A reverse lookup record (IP -> name)
- NS Type: Name Server
- Enter the last octet of the IP address in the Name field
- Enter the FQDN (e.g. host.example.com) in the Host/Domain field
Testing
The best way to test your new DNS configuration is by updating your DNS settings on your local desktop or laptop to use your new server. Under macOS you'd perform this by:
- Run System Preferences from the menu.
- Access the Network Preference Pane
- Select your active network adapter (probably Wi-Fi)
- Click Advanced...
- Select the DNS tab
- Delete any nameservers currently configured
- Add a new nameserver that is the IP address of your Synology
- Save your changes
Now you should be able to access your Synology using the new internal name.
If you'd prefer to test using Terminal then you'll want to use the dig command:
dig @[server] synology.example.com
Where [server] is the IP address of your Synology. If it's working you should get a response that looks like this:
macbook-pro:~ myaccount$ dig @192.168.100.20 synology.example.com

; <<>> DiG 9.8.3-P1 <<>> @192.168.100.20 synology.example.com
; (1 server found)
;; global options: +cmd
;; Got answer:
;; ->>HEADER<<- opcode: QUERY, status: NOERROR, id: 47089
;; flags: qr aa rd ra; QUERY: 1, ANSWER: 1, AUTHORITY: 1, ADDITIONAL: 1

;; QUESTION SECTION:
;synology.example.com.                IN      A

;; ANSWER SECTION:
synology.example.com. 86400   IN      A       192.168.100.20
You should have a valid DNS answer in your ANSWER SECTION, if you don't see the IP address portion then you may have an issue with your Zone file and you should take a look at the logs on the DNS Server application to resolve.
You can also test the reverse DNS as well:
macbook-pro:~ myaccount$ dig @192.168.100.20 20.100.168.192.in-addr.arpa PTR

; <<>> DiG 9.8.3-P1 <<>> @192.168.100.20 20.100.168.192.in-addr.arpa PTR
; (1 server found)
;; global options: +cmd
;; Got answer:
;; ->>HEADER<<- opcode: QUERY, status: NOERROR, id: 34498
;; flags: qr aa rd ra; QUERY: 1, ANSWER: 1, AUTHORITY: 1, ADDITIONAL: 1

;; QUESTION SECTION:
;20.100.168.192.in-addr.arpa.      IN      PTR

;; ANSWER SECTION:
20.100.168.192.in-addr.arpa. 86400 IN      PTR     synology.example.com.
You've now successfully configured DNS for forward and reverse lookups on your Synology. The only step left is to ensure that the IP address of your Synology is being configured on your internal hosts, which you'll do on your DHCP server.