
I recently decided to run Kali Linux on my MacBook. I originally thought I'd just build it into a Virtual Machine (using Parallels), but was concerned that I might not have the control over the hardware that I'd need in order to make Kali effective as a learning environment. So, I set about working on a dual-boot scenario. Needless to say, I failed miserably when I opted to have Kali install Grub and it overwrote my primary Boot Manager on the Mac and rendered the system unbootable (and eventually unrecoverable). Thank goodness for good backups...
WARNING: Do not proceed with any of these steps unless you have the ability to restore a bare-metal backup. Everything I'm doing has the potential to trash all of the data on your computer, requiring a clean installation of macOS and subsequent data recovery from backups. I use a combination of Time Machine, CrashPlan, and Arq to back up my system, you should too.
Triple Boot the Right Way
If you're interested in triple booting your MacBook Pro, and Windows is going to be one of the Operating Systems you're going to boot, then take my word for it, this is the only way you want to accomplish this feat.
At a high level, the process goes like this:
- Install Apple's Bootcamp and use it to install Windows 10
- Use Windows 10 to shrink the Bootcamp partition, freeing up space to install Linux
- Install Linux (I used Kali) into the newly freed space
- Install rEFInd as a Boot Manager for all 3 OSes
To be fair, a lot of my instructions and the guide I initially followed, can be found here. However, several of the steps in that guide I didn't have to use at all, so I'm documenting my process here.
Install Apple's Boot Camp
Apple provides a supported method of installing Windows as a dual-boot option for Macintosh owners. There are several advantages to using Apple's process:
- Apple supports this as a way to boot Windows
- Apple provides native drivers for the hardware under Windows
- You will have supported ways to control the Windows and macOS boot process on your MacBook from within Windows (via the Boot Camp Control Panel)
Apple's official documentation for Boot Camp is found here.
Follow Apple's instructions for installing Windows, but make sure you create the Windows partition approximately 64GB larger than what you want to end up with for Windows, that space will end up being given to Linux. Adjust if you wish, I used a 196GB partition for Windows 10, then split it into 128GB for Windows and 64GB for Linux (FYI, a Windows 10 installation with Office 365 installed takes up 68GB, so give yourself enough room under Windows).
Note: Apple only supports Windows 8.1, or newer, for hardware released after 2014. There is no way to install an earlier version of Windows using Boot Camp on newer hardware. See this table to check your hardware and what versions of Windows are supported on it.
Now that you have an Apple-supported dual-boot system running macOS and Windows 10 (presumably), it's time to perform the Linux installation.
Create Partition for Linux
For the purposes of this article, I'm going to install Kali Linux, that's what I used, but installation with ANY version of Linux should work the same way.
The first step is to shrink the Windows partition to make some space for Linux:
- Boot into Windows 10
- Right-click on the Start Menu and select Disk Management
- Select the BOOTCAMP partition, right-click and select Shrink Volume
- Enter the size, in megabytes, by which to shrink the volume. I shrunk mine by 64GB, so I entered 65,536
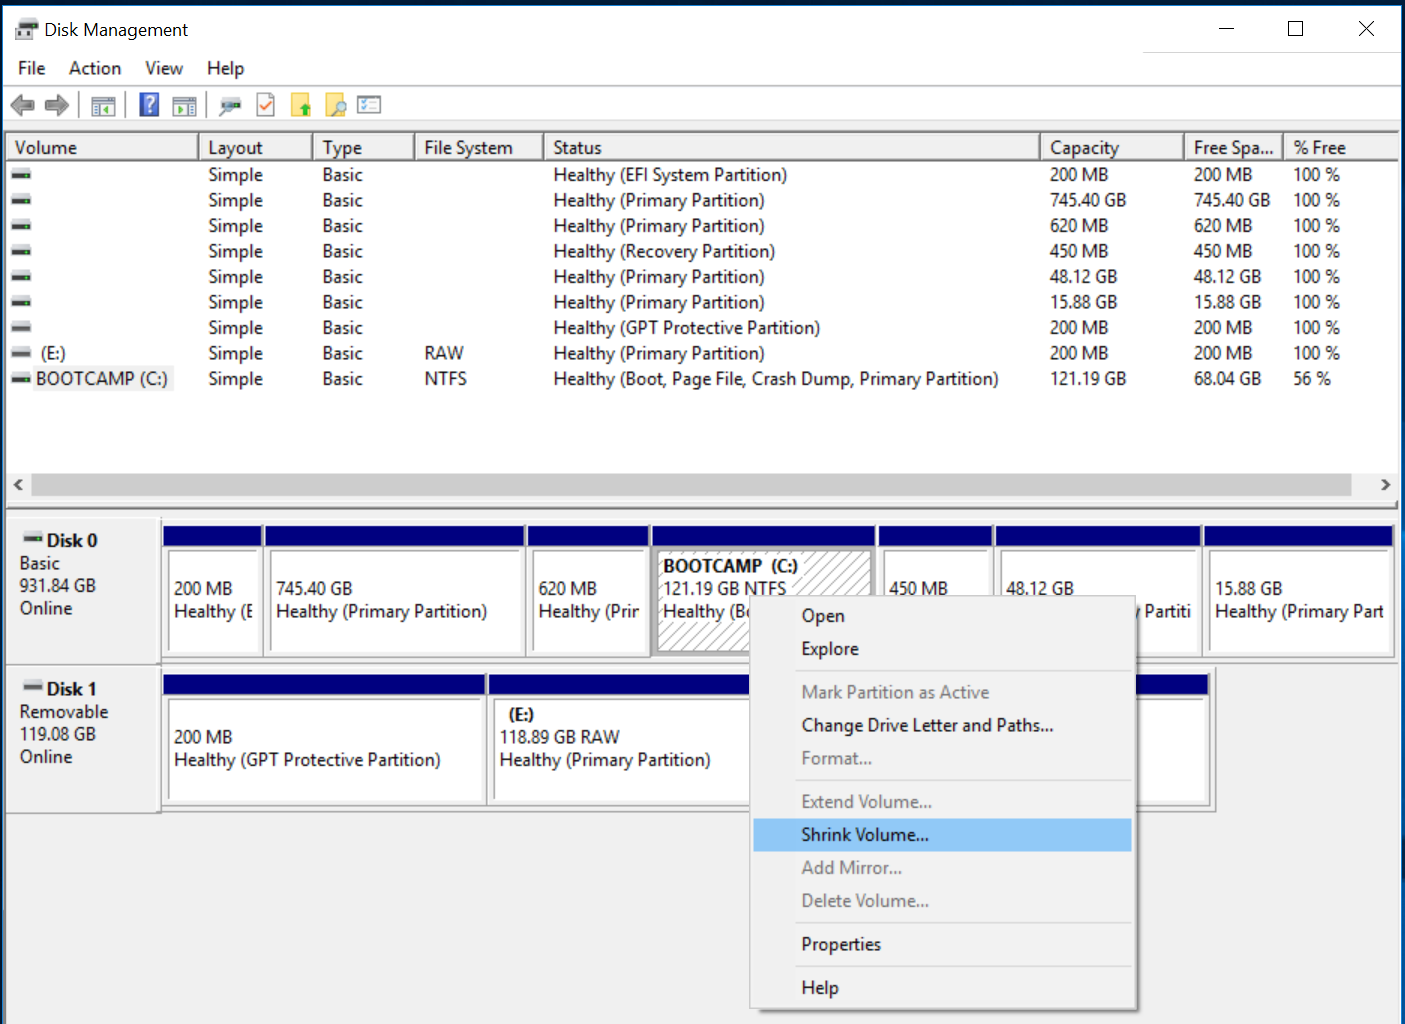
This image is AFTER I did my initial shrink and subsequent installation of Kali linux, you'll have fewer partitions when you do this. I also have an SD card mounted.
The shrinking process took a LONG time (~30 minutes), don't worry about it, let it run to completion and do not interrupt.
After the Volume shrinking process is completed, it's time to download some files to perform the installation; however, you probably want to do this under macOS, so first boot back to your macOS volume and the download them both:
Place all of the rEFInd files (after unzipping) on a removable volume (SD Card, USB drive, or even a secondary HFS+ volume) so you can use it in the next step.
Install rEFInd
For all macOS versions starting with El Capitan (10.11) Apple has enabled System Integrity Protection (SIP). This security feature of macOS prevents changes to various areas of the Operating System including System-owned files. That means that you cannot install rEFInd directly on drives where SIP is enabled. In order to install rEFInd you will have to boot into Recovery. Make sure the rEFInd files are available on a drive that macOS can see and use, then follow these instructions:
- Reboot the computer and hold down Command-R
- Once in Recovery mode select Terminal from the Utilities menu
- Find the volume where you have rEFInd stored (start with ls /Volumes)
- Change into the rEFInd directory and run ./refind-install
- You will still get a warning that SIP is enabled, but you can ignore it (SIP is enabled on the boot volume, but you're not installing it there
Full installation instructions can be found on the rEFInd site.
You may also want to theme rEFInd to look more "mac-like". I used the OSX Standard Theme 1.0 found here. Upate 20200906: This theme's installation instructions ask you to "replace the EFI folder" in the rEFInd install you just did, it ALSO replaces the more curent version of rEFInd and the cryptographic keys that were provided. You probably shouldn't do that, though your milage may vary on getting this to work. At the time of this article's original publication, they were both the same version, but now, 3 years later, the theme's version of rEFInd is woefully outdated. Use with caution or update the components in the theme with the newer versions. (thank you Phillip!)
Test that rEFInd is installed and operational. Just reboot and you should be taken to the rEFInd boot menu, from there you should be able to boot into either macOS or Windows 10.
Note: rEFInd will automatically find what it believes to be bootable volumes. They probably all won't be bootable, through trial-and-error you should be able to find the correct macOS and Windows 10 volumes. You can then configure rEFInd to ignore some volumes, but save that for after you have everything working properly.
Install Linux##
Boot into macOS and have a USB key available to be reformatted, it can be pretty small (small works better), an 8GB drive is perfect.
In order to create a bootable USB drive, you can use the Terminal:
- Run the Terminal from the Utilities folder under Applications
- Change the directory to where you downloaded the ISO for your Linux installation, e.g. kali-linux-2016.1-amd64.iso
- Find your USB key by running: diskutil list, note the drive name, e.g. disk2
- Run the command: dd -if=kali-linux-2016.1-amd64.iso -of=/dev/disk2 bs=1m
- The above command will take a long time to run, as it is imaging the ISO onto the USB drive. Once it finishes you should have a bootable USB key for Kali Linux (or whatever)
Alternatively, if you want a graphical imaging process, you can use UNetbootin as documented here for Ubuntu (just use Kali or whatever image you want).
You're now ready to install Linux. The reason you had to install rEFInd before installing Linux was that, in my experience, I could not get the standard macOS boot manager to recognize the USB drive I had prepared with Kali Linux. However, if you reboot now, you'll see the rEFInd boot menu. You can then insert your USB drive, then hit ESC to refresh the volumes and you should see the Linux installation drive appear. Select it for booting.
Follow the instructions for installing Linux, making sure to select the correct partition that you created while you were under Windows 10 earlier.
Completed
You should now have a triple-booting MacBook Pro. Using rEFInd you can select the appropriate OS and it should boot cleanly on your hardware.
In the event that rEFInd gets clobbered (you'll know, because a power-cycle takes you to the built-in macOS boot manager) you should still be able to boot into Windows, but you'll probably lose the ability to boot into Linux. Just follow the instructions and re-install rEFInd again and it should come back and allow you to boot again.